Saturday, November 29, 2008

Happy Thanksgiving and Happy Birthday

Happy Belated Thanksgiving!! Here at our home this year was, I think, the best and most relaxing Thanksgiving we have had since the arrival of our kids. Simple was the theme this year, so all the dishes were made in the morning (and only a choice few) and then reheated for dinner. This gave us the afternoon to just kind of hang out as a family. It was also Thing 4's "real" birthday date. Grandpa and Grandma came over early to share family gifts with her and the dessert this year was birthday cake. It was so much fun to have the family together - and because all that was needed was a reheat of the food I got to just enjoy the festivities. NICE!!


These photos from Thanksgiving uploaded in the wrong order, but hopefully that's ok. This is what happens when family stays until past midnight. The three year old falls asleep - he was all tuckered out and when he sat down he asked the 8year old to "keep him company" - then promptly fell asleep on his shoulder. The 8year old stayed like that for almost an hour until he agreed to let us put the youngest to bed.
Loose teeth fall out!


New babies are enjoyed! Here is my Thing 1 with the newest addition to our family. Her 3 1/2 month old cousin. So yummy and adorable!


These next photos are from a few days ago at Thing 4's birthday party. Lots of fun things happened. Face painting (done by the oldest daughters) - duck, duck, goose - pin the crown on the birthday girl (we hung a princess dress on the garage door and printed an enlarged picture of my daughter to attach above it-then the kids each tried to pin a crown onto her head after being blindfolded and spinned) - pinata breaking - cake and ice cream


Fleece, knotted pillows


Completed by a 7yo


Prep for notebooks for the kids to make from an idea I found on spoon full of sugar blog. I made it a little simpler so that the kids could do it themselves.


Front of my daughter's notebook.


Inside of the notebook
She had a great time and I think so did her friends. It was so much fun for us as well.


Wednesday, November 26, 2008

The cake

When thing 4 wanted a castle cake for her birthday, I had all kinds of ideas. I was going to do so many things - it was going to be fantastic - because I wanted it to be perfect for her on her birthday.

She had ideas of her own. She made the cake - with help - "We only need a rectangle and a square mom." She helped make the frosting and frosted the cake, with help. Then wanted ice cream cones, colored sugar and sprinkles. We always have these on hand being the incredibly health conscious household that we are :o). She proceeded to frost the cones and add the decorations.
Thing 5 was allowed to help out.

The finished cake. All her doing. I wrote on it - she dictated - I got it wrong. It was supposed to read "Happy 7th Birthday Emma". After completion it was pronounced that this was a "Perfect Birthday Cake"! What a gem she is and I have learned that if they can do it themselves it is ever so much better than something I just do for them.


Monday, November 24, 2008

It's Pinata Time!

Our finished Pinata!
I'm not sure what I expected from our daughter in terms of the finished product, but this was a surprise to me. She just kept asking for different things. Paint, glitter and feathers. Kind of cool!
Painting - this part only took one day to do and one day to dry. Very free form.


Addition of glitter. Feathers followed soon afterward :o). There is still glitter on the floor from this and we have swept and mopped several times. I have even found glitter on some of the towels that are in the linen closet - how did this happen?

The finished product in action. I had the older girls add colored masking tape at the top to reinforce where the strings were placed. It turns out that this was totally unneccesary!! We had 23 children at the party - 5 were mine - and they all got to go through the line twice. I let my older son "bring it down"!

We only used 5 layers of newspaper and liquid starch. I was warned by Shan that too many layers would prove to create an unbreakable pinata. Boy was she right! If we had done the 7 or 8 layers that I thought were needed, I think we would STILL be whaling away at it!! All in all a huge success. Daughter was completely happy with the end result and all the others want one on their birthdays. AHHHH......so much for a day of rest :o)


Sunday, November 23, 2008

Birthday Party Banner

This was such a fun activity to do with the kids. It is called "Glue Batik" and the idea is from The Artist Woman. She has such great ideas to do with kids at all ages.


First, the kids drew a picture on the fabric, then "painted" it with glue. After the glue dried, they painted the squares with acrylic paint that was diluted.

We forgot to make the letters backwards so some of these are facing the "wrong" way, but the kids are very happy with the end product.


To get the squares to stay together, I sewed them onto some kitchen twine to make one long banner. The fabric is just some white cotton that was lying around. I cut it into 8" X 8" squares and let the kids do their own thing. There are balloons, cakes, and the letters. We discovered that the thicker the line of glue, the better the design shows up when complete. We also discovered that the design should be of the simple variety, too much detail becomes a glue blob :o)


This was so much fun that not only my kids, and the neighbor kids, but myself and my husband got into the action and did some of it. When my daughter woke up and saw this hanging she had the biggest smile on her face. It was GREAT!!!


Tuesday, November 18, 2008

A few FO's

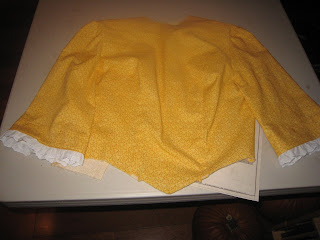
The dress is done except for the hem, hook & eye closure, and tacking down the lace on the collar. I decided that this was the best most efficient way to make the hearts appear "right side up". I just found out that the dress is not needed for the rehearsal this Saturday, so I am now working on the preparations for dd#3's 7th birthday party which is on Sunday. More on that later.

Behold the finished Rook Scarf for dh

I love the way this yarn changes color and as with the Rook Hat, I loved the "V" stitch that is incorporated into the pattern every so often.
Rook Scarf by yarnovermanhattan
Started: 10/17/2008
Finished: 11/6/2008
Crochet Hook Size K
Yarn: Modea Dea Tweedle Dee Shaded Effects
Color: #8919 Surf & Turf
Lot: #83
Measures: 66.5" X 7"
A very easy scarf-I really enjoyed this pattern

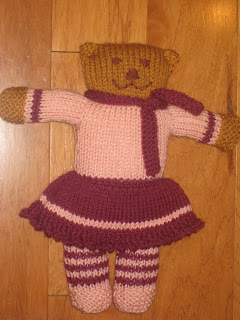
Bear for one of my many nieces
Started: 10/18/2008
Finished: 11/10/2008
Needles: US7
Yarn: All Vanna's Choice
Bear: Color: #130 Honey, Lot: #36063
Shorts, Stripes, Skirt & Scarf: Color: #141 Wild Berry, Lot: #63172A
Shirt, Pink Stripes: Color: #101 Pink, Lot: #62288
Modifications: For the skirt, I added 4 rows of seed stitch and ended with a 2 stitch picot bindoff.
I really like the look of this bead and my embroidery has improved drastically from the first couple of these bears that I completed.


Sunday, November 16, 2008

Dress Progress

The zipper is in! I didn't realize that in this photo there would be some wierd thing sticking out of the top of the zipper - it's my measuring tape. I am very happy with the outcome. I was trying to show the stitching, while not straight it is quite close - it is a little wonky right by the zipper pull, but I think it will be fine. I wound up not using the spray adhesive because I didn't have any and after 7 soccer games (tournaments do that to you) yesterday and 2 pizza parties, the last thing I felt like doing was going out to the fabric store. We all went to Cold Stone Creamery instead!!! Anyway, Kim at Cotton Creek Sewing suggested using a glue stick and since we have no shortage of those lying around here that is what I tried. It worked really well. The zipper didn't move at all.


This is the collar. The facing is just ok.
This part was sewn and ripped 5 times. I thought that the 6th time was a charm, it lay pretty flat, the back part by the zipper is totally enclosed, the lace is standing up pretty straight as it should, I hand tacked it down in several places on the inside and was very happy until this morning when I got up - looked at the little lace hearts on the trim. We probably need to pick a different trim for the top of this dress as this one has a little "header" that is hidden in the seam - I can't just easily rip it out and turn it over so that it is right side up. The only thing left on this dress besides this collar is the lower skirt portion. I think I will put that on and hem it and then think about the trim at the top. As Scarlet O'Hara said, "I'll think about that tomorrow....."


Friday, November 14, 2008

Houston, we have a problem...

First off I want to thank Kathleen C. for the helpful tips she left me in the comments section yesterday. One was a hemming tip that seems to make hemming evenly pretty easy - I will definitely put that one into use. The other tip was for the zipper and that will get tried out either this afternoon or tomorrow when I get to that point in the pattern.


Now, The Problem......If you notice in the above picture, the width of the lower skirt pattern is quite a bit larger than the width of the fabric. Now before I went to buy the fabric I did not measure the pattern pieces - are you supposed to??? I looked over the instructions, figured out my dd's measurements, looked at the back of the pattern envelope and decided how much fabric to purchase adding on some extra just in case. Adding on length does not add width - I have now measured the pattern piece - it is 43" wide. My fabric which stated the width on the end of the bolt as 44"/45" in reality is only 41" wide but not all of it is usable because of selvages. I did wash and dry the fabric, but is this amount of shrinkage normal? I'm not sure what to do - the grand total short in width will be approximately 10". I am thinking that I will need to cut an additional piece of fabric 10" X the length to make up for the shortfall.
This is my progress to date. I am happy overall with the pattern and the instructions so far. This part has gone together very smoothly. Now to put on the upper skirt, zipper, and collar facings. I am looking forward to finishing this part as then my daughter can try it on and we can fine tune the length for the lower skirt portion.

Thursday, November 13, 2008

I am afraid....

A very long time ago I used to sew. I used to sew A LOT. In high school I made quite a few of my clothes including my graduation outfit (thankfully there are no available pictures of that!). Then I left home. As a going away present, my mom gave me her old Singer plain machine - I loved that thing (I actually still have it) but it didn't see much use. Then I got married and we had our first daughter. The sewing machine was pulled out and all manner of cute things poured forth from it. When dd#1 was 6 months old, my husband encouraged me to take a Martha Pullen heirloom sewing class where I learned lace insertions, french seams, pintucks, and so much more. Then dd#2 came along and matching dresses were the thing. Still sewing, but not as much. Then came ds#1 followed closely by dd#3. The sewing machine went into hiding where it has stayed for most of this last 7 years only coming out periodically for something special.


The sewing machine must come out now for a garment. DD#1 has been asked to play her fiddle for a clogger (dance) in an international competition where this clogger will be representing the US. I just found out that the girls need to be in costume. The clogger generously purchased this pattern and gave us some fabric samples. The fabric above is what my daughter chose. I am very intimidated by this pattern - it has darts, the full length means that the hem must actually be straight and even, there is a zipper. Zippers have never been one of my favorite things, not by a long shot. I have finished tracing and preparing the pattern, and cut the fabric. Now I must sew this thing together - it has to look good - and my deadline is November 22nd. Anxiety is very present - panic about to set in. Today I blocked out the time while all the kids are in school to start this. Hopefully I'll make some good progress without too many challenges.......

Monday, November 10, 2008

Knitting & more

This scarf was started a very long time ago. Shortly after #5 child was born 3 1/2 years ago to be precise. I finally finished it while taking some of my daily walks. Yes....I knit during my walks, I guess my sister is right....I am a little strange. I prefer to think "interesting" :o)

India Ribbon Scarf
Needles: US15
Yarn: Lana Grosse "India Ribbon"


It will soon be #4 child's 7th birthday. This year we decided to make our own pinata instead of buying one.


All you need is a large balloon, newspaper strips and liquid starch. It takes a lot of time, especially at this time of year because it needs to dry in between layers - you need 6 or 7 layers in all. Birthday girl has decided that she does not like to get her hands all sticky and gooey so the rest of the family and some friends are finishing it up.


After 3 layers this is what it looks like. We now have 5 layers on it and should be finished early this week. Then to paint, add glitter, gems, feathers, whatever else her heart desires and then we are done!!
I can't believe it's Monday already, I feel like I need a weekend after my weekend - all this soccer is driving me insane. 4 games on Saturday and 1 on Sunday. Then #2 girl decided to try out for the Spring Soccer Select team - we will see if she makes it. Part of me is tired and wants to stop driving to all these practices and games - the other part loves to watch her play. She is so quick and fast and always has a huge grin on her face as she is running down the field - so yeah, I hope she is picked for the team - AND I hope the practices are at the field down the street so we can ride our bikes and the little ones can play!!


Friday, November 7, 2008

Recycling

The recycling bug has hit around here big time. This kids are saving EVERYTHING so that they can use it later for something else.


behold, candywrapper bookmarks for the whole family :o)


I actually thought this was quite clever. DD#1 disappeared into her room, with the door closed I might add (this is new 13yo behavior for us) because she needs PRIVACY!! She reemerged not too long a time later and this is what she had - candy wrappers stuck to long pieces of scotch tape. They work quite well, I am using one in the book I am reading right now and it makes me smile everytime I take it out of the book. Lest I mislead anyone, I was NOT pleased however to learn that this was done instead of homework and said girl had to stay up until after 10:00 pm to finish up.


Who can stay mad for long at a face like that?


Tuesday, November 4, 2008

I can crochet!

Presenting - ta da
The Rook Hat by Sophia at yarnovermanhattan
I really like the fabric that was created with this yarn and the stitch. I am sure that this is really easy for a lot of folks, but at the beginning it was a challenge for me. I soon found that I liked the tempo of the single crochets broken periodically by the "V" rounds.


A closer look at the stitch pattern. It is a little hard to see, but if you look closely at the lighter part you will see an elongated row of stitches. It's pretty cool how this is created.
Rook Hat
Started: 10/14/08
Finished: 10/18/08
Gifted: not yet - intended for dh
Crochet Hook size K
Yarn: Moda Dea Tweedle Dee Shaded Effect Yarn
Color: #8919 Surf & Turf
Lot: #83
I only had to rip this once at the very beginning. The pattern is very well written and easy to follow - even for someone new to crochet :o) I am now in the middle of a matching scarf to go along with it.


The normal Majan Hat Pattern.
Started: 10/9/08
Finished: 10/14/08
Gifted: TO ME!!
Needles: US7
Yarn: Zara Teza, Color: 101 White, Lot: 58636
Plymouth Yarn Encore, Color: 1317 Teal, Lot: 36788
Modifications: I chose to do this in the spiral method - using both the white and the teal at the same time. I added one more round of increases in the crown and added one more pattern repeat of 3k rows, 2p rows to the sides. This hat has the picot bind off edging. This is my new favorite edging. I love the hat, but if I make another one for myself (which I may have to do since this one is in high demand!), I will add another two pattern repeats to the sides - this one hits at about the half way mark on my ear and I kind of like my hats to completely cover my ears. The better to block out the sound of kid squabbling :o)